Building highlighted input field in React
•10 min read

Tl;dr go to the last code block of this post for the final and complete component code!
Creating an Input component that renders its contents differently based on the user’s actions or type of content is a challenge in web development today. Ask any web developer who has tried building one. I’m sure they would shed a tear or two and tell you how they tried building one using the outdated and non-standardized APIs, eventually giving up to a hefty 3rd party library.
In this post, I would like to share my experience trying to build something like this, the challenges I faced, and how I ended up with a sleek solution that’s not only simple to code but also achieves the functionality I was aiming for.
What will I be building
It is important to clearly define what I’ll be building, as I will not be showing you how to build a full-fledged rich text editor, or any type of WYSIWYG thing. My use-case might be very trivial, and the solution I’ll be presenting might not work for your use-case.
I wanted to build a single line text input field which highlights different parts of the input that match a given regular expression. An example of this type of input is Postman’s environment variable input fields as shown below.

contenteditable attribute
Naturally, the first thing that comes to the mind to build something like this is to use the contenteditable attribute.
It allows any HTML element’s content to be edited by the user, and also render the HTML at the same time. Most RTE editors
today make use of this attribute underneath to make things work. While it is an interesting attribute and might solve what
I’m building, it has a long list of flaws:
-
It is dangerous — This attribute allows the user to enter any valid HTML strings, and in turn, can render them on the browser. Clearly a room for tons of security attacks if the input is not sanitized correctly before storing it in some database.
-
Too many edge cases — Rendering content differently is just one part of the puzzle.
contenteditableattribute doesn’t handle any of the extra edge cases that an<input>element handles for us. Things like copy-paste support, undo-redo histories, standard browser support, and many more which we take for granted when using<input>. -
Highly imperative, not declarative — All the APIs to control the behavior of this attribute are very imperative and low level. You are responsible for managing the cursor position, sanitizing the content. You’ll be writing more code to make basic things work than writing the code to define your needs.
-
No UI framework support — At least from my research, none of the popular UI layer frameworks(React, Vue, etc.) control the rendering inside an element marked as
contenteditable. So the developer is responsible for managing how and when things change.
So, should I never use contenteditable?
I’m not saying you should never use this attribute. It has its use cases, especially because there is no other standardized Web API that can do what this attribute does. But if you do decide to use this attribute, you should have a very good reason that other existing libraries don’t already solve. Speaking of libraries, let’s see what choices we have.
The current state of libraries
Thankfully, there are a bunch of libraries in the React ecosystem to build rich RTE experiences. Let’s go over a few of them at the time of writing this post.
Draft.js
Draft.js is developed by Meta and is being used in Facebook. It takes care of the nuances of the
contenteditable attribute and makes it possible to define rich and custom editing experience. It returns a custom JSON structure
of the content that can be safely stored. A quick look at its repository seems as if this library isn’t being actively maintained
with the number of unanswered issues. The API still doesn’t seem stabilized, and the docs aren’t very helpful either. The bundle size
of this library stands at 65kB(minified + gzipped) at this time which does seem on the higher end.
Slate.js
Slate.js is another popular option like Draft.js to build customizable RTEs. It has first-class plugin support, tons of examples
in the docs(even though the library’s API is not well documented), and an active community working on the project. Slate.js also
returns a custom JSON structure of the content similar to Draft.js. The bundle size is smaller than Draft.js and stands at
41kB(both slate and slate-react packages, minified + gzipped), and also seems to support tree-shaking. Slate.js is still in
beta and doesn’t have a stable API. Because of how customizable it is, it might be a little cumbersome to understand and set up the
library the first time. This was going to be my choice to build my custom input field as explained later in the post.
Quill.js
Quill.js is a great out-of-the-box solution for a standard rich text editor. If you are looking for an editor with the standard options like bold, italic, headings, list then this is the best option with the least amount of code. While it isn’t a first-class React library, it does have some wrappers available. It also allows deeper customizations with custom formatting options and returns a JSON-like structure of the content. The library weighs in at 45kB(minified + gzipped). I’m not sure how easy it is to change the formatting of text dynamically based on regex matching. I couldn’t find relevant docs for this. Most of them show how to implement click-based formatting.
X and Y libraries
Obviously, I’m not going to go over every library out there. The idea is to understand what problems existing libraries can solve. Most of the other libraries that I might have missed would also have 90% same features like the ones above. Most of them will have some custom content output structure, some degree of customization, and a hefty bundle size.
After going through the above libraries, I decided to try building my custom highlighted input field using Slate.js. It had a bunch of examples that I could refer to even though the docs were lacking the complete API reference.
Building the input with Slate.js
Let’s start by writing the boilerplate code to use a Slate.js editor.
It was pretty easy to set up a basic input that did not have any custom content formatting.
If you open your devtools and inspect this input, you’ll see it’s just a <div> with the contenteditable attribute!
But the good thing is, we don’t have to manage the rendering of content inside this div. Slate.js will take care of it.
import { useMemo, useState } from 'react';
import { createEditor } from 'slate';
import { Slate, Editable, withReact } from 'slate-react';

import './styles.css';

export default function App() {
  const editor = useMemo(() => withReact(createEditor()), []);
  const [value, setValue] = useState([
    {
      type: "paragraph",
      children: [{ text: "Test input" }],
    }
  ]);

  return (
    <Slate
      editor={editor}
      value={value}
      onChange={setValue}
    >
      <Editable className="input" />
    </Slate>
  );
}
In the above demo, the input allows the user to hit Return to make a new line. I only wanted a single line input,
so the next step was disabling that. This was harder than I had expected. I couldn’t find anything for this in their docs.
Google search led me to a
import { useMemo, useState } from 'react';
import { createEditor, Transforms } from 'slate';
import { Slate, Editable, withReact } from 'slate-react';

import './styles.css';

const withSingleLine = (editor) => {
  const { normalizeNode } = editor;

  editor.normalizeNode = ([node, path]) => {
    if (path.length === 0) {
      if (editor.children.length > 1) {
        Transforms.mergeNodes(editor);
      }
    }

    return normalizeNode([node, path]);
  };

  return editor;
};

export default function App() {
  const editor = useMemo(() => withSingleLine(withReact(createEditor())), []);
  const [value, setValue] = useState([
    {
      type: "paragraph",
      children: [{ text: "Test input" }],
    }
  ]);

  return (
    <Slate
      editor={editor}
      value={value}
      onChange={setValue}
    >
      <Editable
        className="input"
        style={{
          whiteSpace: "pre"
        }}
      />
    </Slate>
  );
}
Now it’s time to define my formatting and conditions to apply that formatting. I was able to refer to the
Leaf which is the smallest unit of text node rendered. Leaf can have custom
properties that can be used for defining custom styles for that Leaf. This was quite straightforward in
my opinion, and here’s how the input field looks like with my custom formatting conditions applied.
import { useMemo, useState } from 'react';
import { createEditor, Transforms, Text } from 'slate';
import { Slate, Editable, withReact } from 'slate-react';

import './styles.css';

const REGEX = /{{(.*?)}}/g;

const Leaf = ({ attributes, children, leaf }) => (
  <span style={leaf.variable ? { color: "green" } : {}} {...attributes}>
    {children}
  </span>
);


const decorate = ([node, path]) => {
  if (!Text.isText(node)) return [];

  const ranges = [];
  let match = null;

  while((match = REGEX.exec(node.text)) !== null) {
    ranges.push({
      variable: true,
      anchor: { path, offset: match.index },
      focus: { path, offset: match.index + match[0].length },
    });
  }

  return ranges;
};


const withSingleLine = (editor) => {
  const { normalizeNode } = editor;

  editor.normalizeNode = ([node, path]) => {
    if (path.length === 0) {
      if (editor.children.length > 1) {
        Transforms.mergeNodes(editor);
      }
    }

    return normalizeNode([node, path]);
  };

  return editor;
};

export default function App() {
  const editor = useMemo(() => withSingleLine(withReact(createEditor())), []);
  const [value, setValue] = useState([
    {
      type: "paragraph",
      children: [{ text: "Test input" }],
    }
  ]);

  return (
    <Slate
      editor={editor}
      value={value}
      onChange={setValue}
    >
      <Editable
        decorate={decorate}
        renderLeaf={Leaf}
        className="input"
        style={{
          whiteSpace: "pre"
        }}
      />
    </Slate>
  );
}
And there we have it! An input component that also highlights its contents that match a regex. Are we really done?
I wish this was it, but sadly it wasn’t. Turns out that Slate.js editors are not completely controlled. This means
that the contents of the editor will not necessarily be the same as the value I’m passing in the value prop of the
editor. This would cause issues when trying to sync the values of two inputs with a shared state variable.
I thought I was missing something here, so wanted to check in the docs what I might have done wrong. After hours of trying to figure out what was going wrong, I gave up. I had tried all possible ways including Slate.js operations(which isn’t documented at all at the time of writing) to forcefully update the editor’s value, but things always felt glitchy or slow.
Do I really need rich text editing?
I had almost given up on this component after spending 2-3 days on it. It was mostly an aesthetic need for me and I was fine with not having it in my UI. This is when it struck me that my need is not really any rich text editing experience. My need is similar to syntax highlighting. Yeah, the good old syntax highlighting that just changes the formatting of some tokens when I’m typing some code. So maybe instead of messing around with full-fledged RTE editors/frameworks, I should look for basic syntax highlighted editors.
A little bit of searching and experimenting led me to <textarea> element
and doesn’t allow turning off multi-lines. So I decided to build a custom component based on the same concept used by the library.
Separating the editing and rendering logic of inputs
By now it should be clear that we want to separate the logic of editing and the logic of rendering input’s contents.
- The editing logic should be the same as any regular input(single line, undo-redo support, maintain cursor position, etc.).
- The rendering logic should be defined by us based on some conditions of the input contents.
So how do we separate them?
The answer is quite simple! We just fake a regular <input> for the user to type, but overlay it over a <div> that renders the
contents of the <input> according to our logic! Here’s how it would look like.
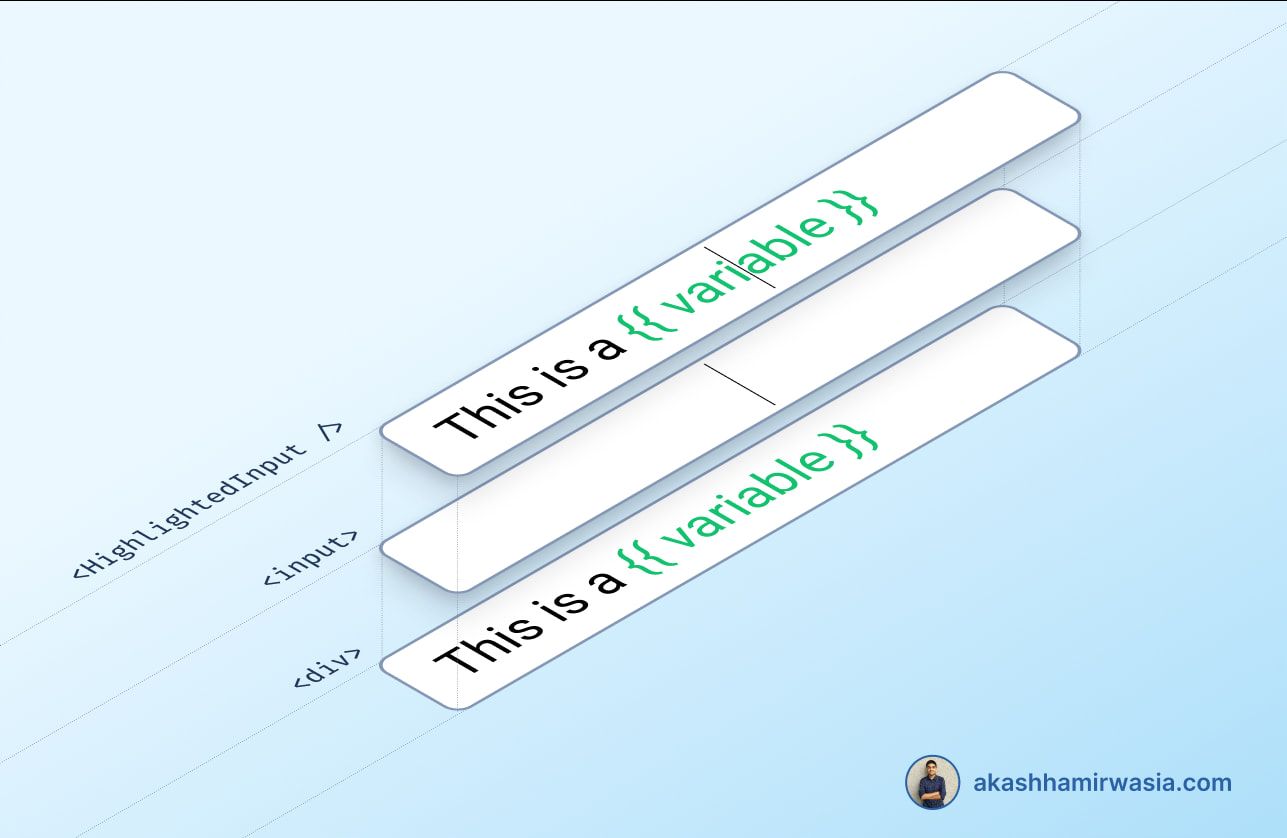
Notice how the <input> element maintains the cursor position but doesn’t render the text itself. The rendering is passed to the
<div> below it, thus giving an illusion to the user that they are editing a single input field.
Coding a basic implementation of this approach was quite easy. With absolute positioning, we can overlay <input> above the
<div>. For hiding the text of the <input> but not the cursor itself, we can set -webkit-text-fill-color: transparent; on the <input>.
import { useState } from 'react';
import './styles.css';

export default function App() {
  const [value, setValue] = useState('Test input');

  return (
    <div className="input-container">
	  <input
      value={value}
      onChange={(e) => setValue(e.target.value)}
    />
      <div className="input-renderer">
      	{value}
      </div>
    </div>
  );
}
The above demo works like a normal input field but internally the editing and rendering logic are separated!
There are still some edge cases that break, but I will sort them out at the end. Let’s proceed to custom highlighting
based on a regular expression. We can simply extract the tokens from the value state variable(using our regular expression),
and render them differently in the <div>.
import { useState } from 'react';
import './styles.css';

const REGEX = /({{.*?}})/g;

export default function App() {
  const [value, setValue] = useState('This is a {{ variable }}');

  return (
    <div className="input-container">
      <input
        value={value}
        onChange={(e) => setValue(e.target.value)}
      />
      <div className="input-renderer">
      	{
        	value
          .split(REGEX)
          .map((word, i) => {
            if (word.match(REGEX) !== null) {
              return (
                <span key={i} className="green">
                  {word}
                </span>
              );
            } else {
              return <span key={i}>{word}</span>;
            }
          })
        }
      </div>
    </div>
  );
}
That was pretty simple I’d say! Let’s finally handle the following edge cases:
- Text overflow — Some CSS tricks to the rescue!
- Input scrolling synchronization — By listening to
onScrollevent on<input>and applying the same scroll position to the<div>. - Extra user selection — Can be prevented by preventing the underlying
<div>to be user-selectable. - Placeholder support — by applying
-webkit-text-fill-color: transparent;only when input is not empty.
import { useState, useRef } from 'react';
import './styles.css';

const REGEX = /({{.*?}})/g;

export default function App() {
  const [value, setValue] = useState('This is a {{ variable }}');
  const ref = useRef(null);

  const syncScroll = (e) => {
    ref.current.scrollTop = e.target.scrollTop;
    ref.current.scrollLeft = e.target.scrollLeft;
  };

  return (
    <div className="input-container">
      <input
        value={value}
        onChange={(e) => setValue(e.target.value)}
        onScroll={syncScroll}
        placeholder="This is a placeholder!"
      />
      <div ref={ref} className="input-renderer">
      	{
        	value
          .split(REGEX)
          .map((word, i) => {
            if (word.match(REGEX) !== null) {
              return (
                <span key={i} className="green">
                  {word}
                </span>
              );
            } else {
              return <span key={i}>{word}</span>;
            }
          })
        }
      </div>
    </div>
  );
}
And that was the cherry on top! We finally have a sleek input field component that’s under 100 lines of code and works just as expected. Let’s wrap up this post by discussing a few pros and cons of this approach.
Pros
- Very easy to implement. It makes use of fairly common CSS properties and JS APIs. No need to learn another deep framework.
- No external library or hefty framework is required, hence bundle size is negligible.
- Retains all the features of a regular
<input>like undo-redo, copy-paste, scrolling, and other accessibility features. - No need to worry about sanitizing the user input since we are not dangerously setting
innerHTMLanywhere. - Allows us to use React to declaratively define how content is split into tokens and rendered.
- Also makes it possible to make the component uncontrolled internally, and controlled externally.
- Pretty good browser support.
Cons
- It is an illusion and can break easily if the content of both
<div>and<input>don’t exactly overlap. - This also severely limits the styles that can be applied to the tokens. Anything that changes the width or spacing of tokens would break the illusion. In my case, this wasn’t a problem as I wanted a basic color change.
- It is also not possible to have the underlying tokens in the
<div>to respond to hover or clicks. I haven’t found a workaround for this, if you find something, I’d be glad if you could share it with me! - Might not work on very old browsers. Example — on some versions of Safari, multiple events need to be handled for synchronizing the scroll position correctly.
Conclusion
This entire journey was a great learning experience for me. I did face a lot of hurdles, dead-ends and wasted quite a lot of time, but I’m glad to have finally come up with a solution that works for my use case. This also showed me how we as developers sometimes tend to over-generalize problems so that we can find long-term solutions, which can lead to increased code complexity in the short term.
I hope this post helped you in some way, it took me quite some time to write. Feel free to share your thoughts on

